Thursday, October 26, 2006


The Butter Shot, for Candy

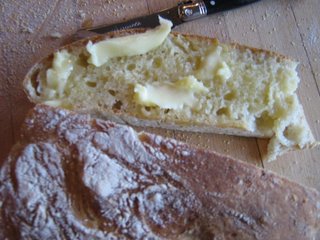
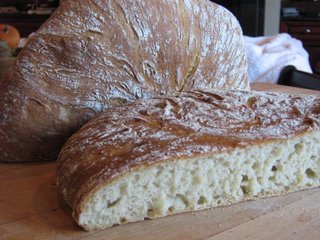
This slice of bread has at least 2 tablespoons of butter on it, all melted in and tasting fantastic (because its organic). Can someone else out there pay the extra money and do a taste test between organic and regular butter to make sure its not my imagination? In many foods I cannot tell, (and I have tried), but for this particular ingredient the flavour of the organic butter kind of hits me over head. A second or third opinion is needed.

I'm going to be out of town off and on for the next week or two. I will try to post while on the road.

Monday, October 23, 2006


Tuscan Oatmeal Loaf

After my struggle with the artisan bread, I decided to make a variation of a Tuscan Bread to lift my spirits and remind me what a good bread tastes like. I used leftover oatmeal for the bouillie, which results in a great tasting but much flatter bread than is usually expected from the original recipe. (If one was to follow the recipe as written below, you will get a bread 1/3 more domed than in my pictures.)
The author of the Village Baker, Joe Ortiz, has my favorite Tuscan bread recipe that I started with years ago. My most successful unsalted breads have been a variation of his recipe. I recommend his book for any bread maker, and here is his recipe. I have included a little of his intro as I think this is a gem of bread theory.

Panne Tuscanno
Tuscan Bread

The boullie (mush) process breaks down the gluten in the flour, resulting in a wilder texture; it also brings on a fermentation that produces a more earthy flavour in the bread.

Makes 1 round, 2 lb. loaf

6 cups organic, unbleached white flour (or all purpose)
1 3/4 cup boiling water
1 pkg (2 1/2 teaspoons; 1/4 oz.) active yeast
1 1/2 cups warm water

To Make the Bouillie, place 2 cups of the flour in a bowl or container and pour the boiling water over it. Let the mixture sit for 5 minutes, then mix to incorperate, making sure there are no dry spots. Let the bouillie sit overnight covered with a damp towel. The bouillie should rest for between 15 and 24 hours. It will not have risen at all, as it will still be a moist porridge.

To Make the Dough, proof the yeast in the warm water. Turn the bouillie into a large bowl and add the yeast mixture. Stir until the entire mixture becomes a paste that is somewhat smooth and soupy enough to be beaten vigorously with a wooden spoon.

Add the remaining 4 cups of flour, a handful at a time, working the pasty mixture... until it is smooth and satiny. eventually it will form a medium-wet dough and you should still have several handfuls of flour left. Using up the rest of the flour, knead the dough for about 8 to 10 minutes on a worktable.

Let dough rise, covered, for between 1 and 1 1/2 hours, until it has doubled. Shape the dough into a round, irregular loaf by flattening it and then folding the edges toward the middle and sealing the seams with the heel of the hand.

Let the loaf rise for 30 minutes. Then, with the palms of your hands, flatten the loaf a few inches so that it is half its original height, and flip it over onto a well-floured surface. This helps give the dough its irregular shape. Cover and let the loaf rise for another 30 minutes.

Then pick the loaf up off the table and, with your hands, stretch it out by a few inches. Bake the loaf on a baking stone in a preheated 400F oven for between 45 and 50 minutes. Or the loaf can be baked directly on a baking tray. Shut off the oven and let the loaf remain inside for 5 minutes to develop the crust, which should be golden and firm to the touch.

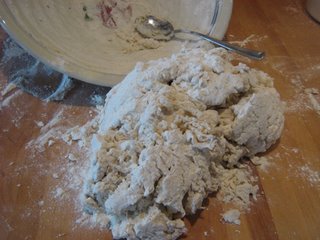
Rough dough, Tuscan Oatmeal Loaf

In every recipe I do, I stir most of the flour in until it looks like this, reserving one cup of flour to dredge the table when needed. I love how the dough looks an utter mess, and then within about 10 strokes of kneading it becomes a well behaved dough.

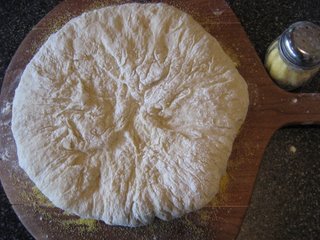
Oven ready, Tuscan Oatmeal

You can see this is a pretty big loaf, approx. 10 inches across, unbaked. Sometime I bake this recipe as two smaller loaves.

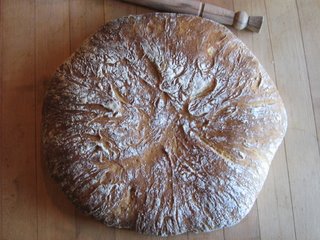
Profile, Tuscan Oatmeal Loaf

You can see here that I got a little "spring" from the heat of my baking stone and a splash of water in a pan on the shelf below to give the oven a blast of steam. (Spring is how much the bottom of the loaf comes off the bottom surface of whatever you are baking on. If you have good spring you have the potential for a nice rounded loaf - unless you use one third of the grain in oatmeal like I have - the result is a flatter loaf because there is less gluten from all that oatmeal)


Interior, Tuscan Oatmeal Loaf

I cut into this bread when it was hot from the oven - I couldn't wait to eat it. Because of this the interior crumb and bubbles are not as defined as they should be.

Friday, October 20, 2006

Good God, I forgot the recipe!

Leaven Recipe
The Handmade Loaf
by Dan Lepard

Day 1
150 g water at 20 C
2 rounded tsp rye flour
2 rounded tsp strong white flour
2 rounded tsp currants or raisins
2 rounded tsp live low fat yogurt

Mix all the ingredients in a 500ml Kilner jar. Cover and leave at room temperature (approx. 20C) for 24 hours.

Day 2
50g water at 20C
2 rounded tsp rye flour
2 rounded tsp strong white flour

By this stage there will be no perceptible change, though some yeasts will have multiplied. The surface will look shiny as the solids separate from the water and sink down in the jar. Stir the above ingredients into the leaven, starting with the water, followed by the dry ingredients. Cover and leave again at room temperature (approx. 20C) for 24 hours.

Day 3
100g water at 20C
4 rounded tsp strong white flour
4 rounded tsp rye flour

By this time the raisins (or currents) will have started to break down and you will notice a coffee coloured ring around them as they sit in the mixture. Also, there will be the odd pin hole of fermentation on the surface. Add the water, stir well to combine, then add the flours and stir again. The mixture will look frothy, but this is simply from the stirring. Nearly there. Cover and leave again at room temperature (approx. 20C)

Day 4
100g water at 20C
125 strong white flour

By this time the froth of fermentation should be beginning, though there will be only the vaguest hint of acidity in the aroma. Remove and discard three-quarters of the mixture. Add the water and stir well. Pour the mixture through a tea strainer to remove the raisins (or currents), then put the strained liquid back into the Kilner jar. Add the flour and stir again. Cover and leave at room temperature (approx 20C) for 24 hours.

Day 5
100g water at 20C
125 strong white flour

The fermentation should be clearly evident, and the aroma starting to become acid. You can notice this the moment you remove the lid from the jar, though it disappears quickly. Remove and discard three-quarters of the mixture. Add the water and stir well so that the mixture thins evenly. Stir in the flour so that you have a thick paste. I prefer to keep the refreshment slightly heavier on flour than water, as this slows the fementation and stops the leaven rising and falling too quickly. Cover and leave again at room temperature (approx. 20C) for 24 hours.

Day 6 Onwards
Take the lid off the jar, and you will see the mixture bubbling. Each day, as you remove some leaven for baking, replacing it with the equivalent amount of flour and water, the aroma of the leaven will become stronger and more sharply acidic.


Some of my books
Action Shots, continued.
(I was having some problems with posting yesterdays post, so its cut in half)


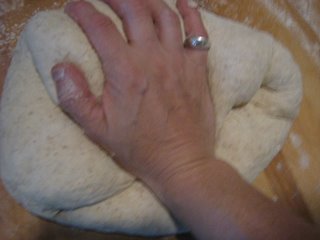
Kneading


Kneading, slowmo

For all this work, and the good lookin' photo op that I lured you in with, the bread was pretty much shite. The profile shot shows how wonky it is on the outside, and it was kinda tacky and dense on the inside. Not to the point of being unedible...it makes fine toast. It is all because I starved the starter those few days. I am trying to bring it back to full capacity, but have also started another one that I will try to take care of.


Profile


Interior

The one thing I can say about screwing up is that it always makes me a better baker. It is really hard to describe a dead dough, but when you have one you certainly know it. A dead dough feels kinda cool, like a cross between a pastey glue and cornstarch mixed with water. You can knead it into a ball that looks ok, but within moments is starts to spread and droop. Of course, I had to cook the dead dough, because curiosity reigns in our house, and yes, it was awful.

Thursday, October 19, 2006


Two Artisan Loaves

Short of being baked in a wood fired oven, (I do my best to recreate that enviroment by never cleaning my oven, so particles of flour, scraps of dough and what not combust regularly in there giving everything what I pretend is a woodsy kind of flavour), these loaves are made from scratch.
Ok, I didn't grind the flour either, but the red fife wheat was milled almost locally, (Victoria - thanks Erica if you ever run across this), and the all purpose was milled in Armstrong. Both were grown on the Canadian Prairies.
I made the starter loosely based on Dan Lepard's recipe from the Handmade Loaf. I will state here that his pictures, or rather photographs, are much better than mine, and there are alot of them in his book, for those who like that kind of thing.

Six days ago I started here.


Using Lepard's recipe as a guideline, (recipe will follow at the end), I started with a few raisins, all purpose flour, rye flour and water, (He also adds yogurt). Stir it up and let it sit for a day. Next day add more flour and water, stir and sit again for a day. Do this again the next day. Day four you add water, strain out the raisins, pour off some of the watery sludge, then add flour etc...day five you pour off 3/4 of the sludge, add more flour and water, stir, sit for a day again. This is called feeding the starter, and it can go on forever.
The starter is ready to use after day five. Instead of tossing the doughy starter stuff you use it to leven your bread.
I have never ever EVER done this in 5 days. I always forget it for one day along the way. This week was no exception, and I think I forgot about it for at least two seperate additions. It seems I have pushed the boundries of the starter too far because the loaves were far from perfect.


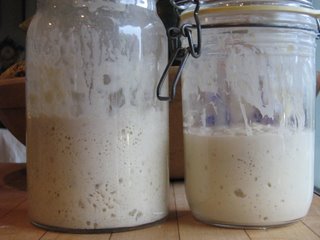
Starter - Day Four

You can see the nice bubble action happening in the starter. This is what is should look like. I then left the starter for an extra 24 hours without feeding it, (which I think I had done at least once already to the thing). When it was at its finished stage I used it anyway, because there were some bubbles, but certainly not as much as in day 4.

And now for some action shots.

Tuesday, October 17, 2006


Autumn


Cupcakes, but I didn't make them.

Had a busy Sunday. Met a freind at the cupcake store, so I had to do my usual morning sample. We ate some of these with coffee. The icing was a butter cream, made with icing sugar. Too grainy for my taste. And I have become spoiled by using organic butter, (thank god my mate doesn't read this because he always gives me hell for using it because it is going to break us), but it tastes soooo good, while leaving icing made with regular butter somewhat lacking. The cake part of the cupcake was good, but if these cupcake places insist on putting so much icing on the cupcake, they should make sure it is perfect, because it is all one remembers.

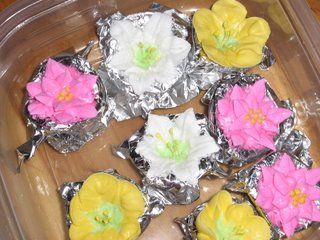
Then I went to my cake decorating class. Hmmm....we made flowers.


Now, the flowers are not my thing. As I look at them on the counter I find them hideous... but endearing. But while I am making them I kind of get into it, in a paint by number or doodle art sort of way. The one compensation for spending 4 hours in an icing class, resulting in 11 flowers, (one got trashed for being a mess), is that the kids are pretty impressed that I can make candy flowers.
I didn't learn a ton in the class. We only worked on Royal Icing...(I'm not sure what I was expecting), and after one covers the 5 points about it there really isn't much to it.
BUT - it is the perfect vehicle to do research on salmonella, and that is what I am off to do now, a little refresher course on food safety - unless someone can answer these questions for me.
If using fresh eggwhites, (verses freeze dried), and you dry royal icing decorations, will the salmonella bacteria continue to grow in the dry icing enviroment? (Assuming that the delicate little decorations dried out within a couple of hours) How does the sugar content effect the bacteria growth? What happens if the decorations got damp and stayed that way for a few hours?

Saturday, October 14, 2006


Cake is ok, but its the batter and icing that is the best.

While the man is out playing with his new old land cruiser, I am writing a quick entry. You see, no one in my house knows I am a blogger. I should be writing for publication, not pleasure. At least thats how the thinking goes in some quarters. That's what comes with living with a writer I guess.

Thursday, October 12, 2006


Chocolate Chocolate Cake

Just playing around with decoration options. I like the galactical swirls with silver centers, but I am still not content. This cake had two layers of chocolate ganache filling and a generous ganach crumb coat, topped with the chocolate butter cream. It was way too much ganache for my taste, although everyone else seemed happy to eat every last bite on the plate. They were probably being polite - not that I hang with a particularly polite crowd. I think I will have to whip the ganache next time.

It is now time to speak a little of coffee. Here are some photos for inspiration.


These people make a pretty fine cup of java. Too bad they are so fucking precise about the martha pattern on top. I find it beautiful in an irritating way and get immense pleasure and satisfaction in messing it up. It makes the coffee taste so much better.


This is my coffee at home. It is my idea of a perfect lait. The thick espresso foam is pushed to the edge by the milk foam so I can work my way around the bowl sipping it off. I can scoop little bits of the milk foam off (untainted by espresso) for the cat or kids. (Or perhaps I'm just saying this because I can't make the martha-like wheat chef pattern. I doubt it.)
The milk is not scalded, but hot, (if the milk is scalded, or heaven forbid, boiled, the lait will taste not nearly as good as it should). One should never burn their tongue from a cup of coffee. The bowl is beautiful, with a heavy base - not tippy. I'm a bit of a snob here, as I think the perfect bowl for coffee is made in France. I'm not sure why, but the shape is ideal, and the density of the porclain seems just right.
I hate coffee served in glass. It could be the best coffee in the world and I hate drinking it out of clear glass mugs, cups, whatever. All those lait layers, pfft, save it for my shooters please. I don't like the glass against my lips, and it always seems to hot. Then, after I'm done my coffee I have to look at the scuzzy film remaining in the cup.
But the worst is styrofoam. It keeps the coffee way too hot, and if the person making the coffee has boiled the shit out of it, it will never cool down. I always burn my tongue when I drink out of styrofoam. And then there are the enviromental concerns, (although I am sure they make something styro-like that is biodegradable), but it still does't deal with the heat factor, or the weird texture styrofoam has against my lips. Not to mention that I compulsively want to bite it, making for sloppy drinking.
Does any one else ever feel like they have to bite styrofoam?

Wednesday, October 11, 2006


Stove Roasted Garlic

I should probably call this boiled garlic, but It doesn't taste boiled...it tastes buttery rich, and the oil it is cooked in is seasoned perfectly for salad dressings, cooking or for dipping bread into. And yes if you add balsamic to the garlic flavoured oil it is really really good. Use the softened, cooked garlic to thicken salad dressings, or spread warm on fresh bread as is. Or eat it like candy.
I started cooking garlic this way when I was cooking proffesionally as a way to solve fights over oven space. We almost always had space stovetop. I have only recently started flavouring the oil while cooking the garlic. I decided to add the rosemary and a chili pepper part way through the cooking process, and it added a lovely flavour, albiet mild. If you wanted to punch up the rosemary and chili taste you could crush the rosemary with the flat of your knife, or pound it breifly with a wooden spoon, ( very theraputic and satisfying, with heavenly aromatic tendrils wrapping around you while you smash it ). Cut the chili pepper in half to expose the seeds and the heat. The longer both those sit in the oil the spicier and more aromatic it will get.I prefer the more subtle flavours of leaving the seasonings whole.
I often just pound the rosemary for no other purpose than pleasure. I am so happy to have it growing on my deck again.
I'm not sure I need to include any instructions to this photo, but for those who would like them:

Peel two heads of garlic. Place in a small sauce pan, and cover with oil, I usually use a blend of grapeseed oil and olive oil. Add a sprig of rosemary and a chili pepper of your choice. You can use a dried pepper if there are no fresh available. You could probably use dried rosemary, but it would have a slightly different taste.
Bring the little pot of garlic, oil and flavourings to a simmer, then turn the heat to low, maintaining a very slow simmer. Cook until the garlic is soft and golden. Remove from the heat, cool completely. Remove rosemary and chili and tranfer to a glass storage jar. Keeps for quite some time in the frige. We usually eat it within a couple of days, but I'm sure it would be good for at least a week, if not more.

Thursday, October 05, 2006

Cake for Breakfast
The cake I made last night tastes really good cold from the fridge. The whipped ganache is so light that its' texture is lovely. The butter cream is a little firmer than the ganache, so melts at a different speed in the mouth, so you have a layering of flavours.
The white balls really have to go, not only do I have to listen to their rude crunch much too early in the day, but it feels like my teeth are cracking. A drizzle of melted bittersweet chocolate would have been better....giving a nice crunch like sensation that would melt as soon as you felt its' resistance.
This is not a particulary good looking cake. The cake itself had fallen a little, so the filling kind of bulged a bit. With a little work on the cosmetic side, this cake will be good.

I realized in retrospect how awful it was to post my fridge for all to view. I think I must defend it and myself. First, it is not dirty. Just full. I am going to go and take a quick inventory...
OK, to start, all the condiments had to be moved out of the door because I have three bottles of the same red wine open. I had previously left one unfinished bottle out on the counter and it turned to an unpleasant vinegar. So I decided to refrigerate any red wine I opened that shockingly didn't get finished. Well, its a new procedure, and I promply forgot that this new system, and the next time I wanted wine I just opened up another bottle. Sad to say, it happened again, so that makes three bottles. The real lesson is that I have too many unopened bottles of wine around. Well...not anymore.
Any freinds out there reading this may want to drop by to help me drink said wine, perhaps with cake.
I buy organic milk right from the dairy warehouse to save money, so I go every ten days, purchasing what seems like stupid amounts of milk.
We have at least 3 kinds of jam open at any given time.
A sugar syrup blended with lime for impromptu mojitos.
Another sugar syrup blend for cakes or cocktails.
Roasted garlic in oil...that particular batch is really good - I'll write about it in a day or two.
On the bottom shelf there are various bread starters that hog a ton of room.
My freind brought me 3 dozen eggs from her farm.
She also brought me heritage tomatoes, poblano peppers, chayote squash, chili peppers and more, filling up all the crisper drawers, at least any space left over from the 3 lbs. of mejool dates that I bought in such a vast quantity only to find that everyone else in the house hates them.
Leftover wonton soup.
Leftover potato soup, (I'll have that today).
The remains of a roast chicken. (We'll have that tonight)
More poached figs, because I ate the last batch and you can never have too many of those hanging around.
Oooo, now the condiments - 2 hotsauces, (at least), 2 chili pastes, mayonaise, (yum), miracle whip, (evil hideous kraft food, but my mate likes it, bless his heart), I'm not sure how many mustards, dried tomatoes in oil, truffle butter, ketchp manis, olive oil, tahini, olives, korean chili sauce, (for bee bim bap - sooooo good, one of my favorite meals). There are more condiments in there, and I still don't have enough.
There is more in there, I'm just getting tired of writing it all down.

I guess what I am trying to say is all the stuff is good. Its not rotting in there, its just packed in there.

Wednesday, October 04, 2006

A Work in Progress

All right, I just figured out how to put a picture on the blog. There have been some requests for photos, so here we go. I thought I would throw up (pun intented as I've eaten a ridiculous amount of icing, not to mention the finished cake), a bunch of snaps on a little cake I'm working on...I'm trying to make the perfect mocha cake. The cake is a devil's food style made with buttermilk and coffee,(espresso), the ganache is white chocolate blended with a little milk chocolate, whip cream and espresso.


I just like the way this looks with a huge glop of whipped ganache on top.


This has two crumb coats of the ganache on it, and this new glop on top is a chocolate butter cream that was pretty much perfect. I had gotten the sugar syrup a little too hot, (only because I am too lazy to dump it into a pyrex cup to cool it. Ideally I heat it to just below the required string stage - or whatever it is called - an let it cook a few more moments in the pan, (very naughty if you are a perfectionist control freak), while I get my timing together, which you will probably surmise after seeing my eventual fridge photo, is a bloody miracle. Any way, the sugar syrup was mother fricken hot, and made smooth diamond hard and glittering splatters on the inside of my workbowl, ( insert expletives here), if I added it too fast. BUT, The resulting meringue was perfectly stiff but still yeilded to the butter. It had no problem taking on the generous load of bittersweet chocolate I added. And voila, that is the said buttercream on top.


This is the almost finished cake, with its random mounds on top.


Side view, before the kids got a hold of the little white sugar balls. Actually, just took a closer look, and its an after shot....lots of sugar.


OK, the top shot, and we are almost done.


We promptly ate the thing, so its only right that you can see the sloppy interior. Having not taken the time to cool the cake between each layer you can see it sag and crumble. But looks aren't everything, and it tasted not too bad.


This is the best picture. My fridge is just like my mind. There is lots of stuff in there, all ready to be used if I just took the time to rifle through all that crap instead of just shoving more in there.

For any of you that actually slogged through all of this, (Candy, I know you made it this far if only to see if I made any hilarious spelling mistakes), I want to take this opportunity to tell you what I think a buttercream icing should be.
It should melt in your mouth in such a way that you need to have another taste - that means no weird fat additives other than butter.
There should be no grainy texture. If satin were food, it would be buttercream.
All flavourings should not overpower the buttercream. Ideally you should go through a process where the flavours kind of rise and fall with each mouthful. Has anyone tasted durian? Its weird stinky stuff, but the flavour is un-fricken believeable - its like the chameleon of the food world....berries, garlic, citrus, fungus... the flavour changes pound you like big surf. Well buttercream should have those waves of flavour, but in a more subtle motion, perhaps like the gentle laps of a protected harbour.

I'm sure I have more to say on cakes, icing and ganache, (don't get me started, at least not yet, on chocolate). I'm also very fussy about coffee, and that is an understatement.

I guess I shouldn't go without including at least one recipe.

Whipped Mocha Ganache

Ingredients:
double shot of espresso, or more if you like
1 1/2 cups whip cream, (approx.)
13 oz. white chocolate
4 oz. milk chocolate

Preparation:
1. Pour the espresso into a 2 cup liquid measuring cup.
2. Add whip cream to the 1 1/2 cup mark.
3. In a double boiler, or in a st. st. bowl set over over simmering water, combine the chocolates and whip cream, stir really often until melted.
4. Cool and store in the refrigerater until ready to use. It must be fridge cold
5. To use whip until firm peaks form. This doesn't take long in an upright mixer. It will seem like forever if you do it by hand. Use immediately.

This will fill two layers and the exterior crumb coat, (a very thin exterior coat), of an 8' cake. OK, I'm taking an educated guess here. The little cake you saw today was 6 1/2' inches, and it had a ridiculous amount of ganache icing in it and on it, plus the butter cream.
Note: I find heating the white chocolate in a double boiler/baine marie a much safer method than the microwave since white chocolate burns very easily at low temperatures giving you a grainy result. On the stove you need to stir it lots and then you can watch for over heating.

If you have any questions, or anything seems unclear, don't hesitat to let me know.